Introduction
TLDR: using http-server for web-service and json-server as a mongodb replacement will speedup your prototyping of angularjs application.
Building an angularjs prototype can be hard, actually it’s like you’re already creating the whole app. You need to setup mongodb to store your data and then setup expressjs to create a restfull API, sometimes you don’t need this setup but most of the time you need the CRUD functionality while prototyping.
Setup
For this article, I assume you’re working on nodejs environment.
The Layout
So first, install http-server globally, it’s a zero-configuration node module that can magically load your static files in the browser. How cool is that? Working node website without using and configuring framework like Expressjs.
npm install http-server -g
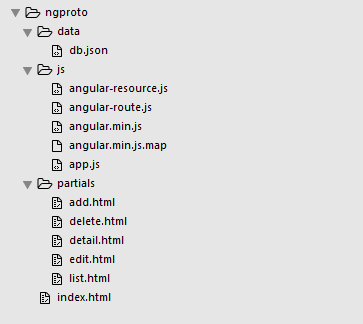
After installing, let’s construct our files and folders. I created a folder name ngproto as a container of our application. Then inside are the js, partials, and index.html. This is a very basic html setup, you can do you own style here.

- index.html is the file that will be served to the browser. It’s a basic website setup with all the css and angularjs included. On the body, I instantiate our angularjs app called
contactAppand hasng-viewwhere we can display the appropriate partials based on the user’s action. The view was also wrapped in a bootstrap layout - js folder contains all javascript files. I already added the necessary angularjs for this application. There’s also app.js file where we will be writing our angularjs code.
- partials folder contains our view templates.
- data folder will be our database container which we will setup later in the next section.
Contents of index.html file.
<!DOCTYPE html>
<html>
<head>
	<meta charset="UTF-8">
	<title>Prototyping Angularjs</title>
	<link rel="stylesheet" href="https://maxcdn.bootstrapcdn.com/bootstrap/3.3.5/css/bootstrap.min.css">
	<link rel="stylesheet" href="css/styles.css">
	<script src="js/angular.min.js"></script>
	<script src="js/angular.resource.js"></script>
	<script src="js/angular.route.js"></script>
	<script src="js/app.js"></script>
</head>
<body ng-app="taskApp">
	<div class="container">
		<div class="row">
			<div class="col-md-6 col-md-push-3">
				<div ng-view></div>
			</div>
		</div>
	</div>
</body>
</html>
After this setup, open terminal and cd to this directory and type http-server then enter.
http-server
Now open your browser, visite http://localhost:8080/ and boom!!! Nothing!!! That’s because we’re not displaying anything yet. You can inspect the page and check if the index.html was really loaded, you can also see some angularjs error in the console. We’ll fix that later.
The REST API
Second module that you need to install is the json-server. This module gives you an instant REST API without setting up mongodb.
npm install json-server -g
After installing, it’s time to setup. Create a new json file called db.json inside the data folder. On that file, we’ll create our schema. It’s just simple contact information including id, name and number, you can add other informations if you like but for the purpose of this article it is enough.
Contents of db.json file.
{
  "contacts": [
    { "id":1, "name":"Spongebob", "number":"1234432534" },
    { "id":2, "name":"Patrick", "number":"986786886" },
    { "id":3, "name":"Squidwards", "number":"2345556709" },
    { "id":4, "name":"Mr. Krabs", "number":"0867545354" }
  ]
}
Our database contains list of contacts. To test this, open another terminal and cd to the data directory and type json-server db.json then enter.
json-server db.json
Now open your browser and visit http://localhost:3000/contacts to view all our contacts.
To view a task with specific id, just add /id_number in the url like http://localhost:3000/contacts/1
Now we have a REST api. You can learn more about json-server here
Creating our Angularjs Application
So after all these setups, let’s build our angularjs application by writing some code in app.js.
'use strict';

angular.module('contactApp', ['ngRoute', 'ngResource'])
	.config()
	.factory()
	.controller()
You may have done it in a different way like assigning angular.module in a variable and reference it everytime you create controllers or use other services but this is a simple project so it’s ok, let’s discuss about the best practices in the future post. First instantiate my application name with angular.module together with the dependency modules. Then setup the urls in config(), followed by creating the restful functionality in factory() service, and then create the controllers.
URL Configuration
Let’s start configuring our URLs. We’ll create these pages inside our .config() using angular’s $routeProvider:
The routeProvider is a provider from ngRoute module and it’s not part of angular’s core. It’s in a separate file that you need to download and include in your html.
"/"page to display all our contacts"/add"page to display the form for adding new contact"/1"to display a single contact item with its other information"/1/edit"to display the form for editing the selected contact
.config(function($routeProvider){
	$routeProvider
		.when('/', {
			controller: 'listCtrl',
			templateUrl: '../partials/list.html'
		})
		.when('/add', {
			controller: 'addCtrl',
			templateUrl: '../partials/add.html'
		})
		.when('/:contactid', {
			controller: 'detailCtrl',
			templateUrl: '../partials/detail.html'
		})
		.when('/:contactid/edit', {
			controller: 'editCtrl',
			templateUrl: '../partials/edit.html'
		})
		.otherwise({
			redirectTo: '/'
		});
})
$routeProvider has a .when() method which adds a new route in the $route service. This method accepts 2 parameters, path and route properties. When path matches the current URL, it will assign the route properties to $route.current. So in our config setup, when viewing our index page which is the '/' url, $routeProvider checks if '/' was declared and when matched it will assign the route properties to the current page. We will now in the scope of listCtrl and the content of our ng-view will be swapped with the value of templateUrl which happens to be list.html
Learn more about $routeProvider here.
REST Service
For the basic CRUD (create, read, update, delete) functionality, I’ll be using angularjs’ $resource.
The $resource is a service from ngResource module and it’s not part of angular’s core. It’s in a separate file that you need to download and include in your html.
.factory('ContactData', ['$resource', function($resource){
	return $resource('http://localhost:3000/contacts/:contactid');
}])
That’s it!!! We wrapped $resource in a factory provider so we can reuse it inside of our controllers later.
Learn more about $resource here.
The Basic Angular CRUD
Displaying All The Contact Items
When we are viewing our index page which is "/", we will be using the listCtrl controller and partials/list.html template. So let’s create them.
.controller('listCtrl', function($scope, ContactData){
	$scope.contacts = [];

	ContactData.query(function(data){
		$scope.contacts = data;
	});
})
In this controller we use the ContactData service to get all the contacts in our database (json-server). Now let’s display the fetched data in partials/list.html.
<h3 class="clearfix">
	All Contacts
	<a href="/#/add" class="btn pull-right btn-primary">Add New Contact</a>
</h3>

<ul class="list-group">
	<li class="list-group-item clearfix" ng-repeat="contact in contacts">
		{{ contact.name }}
		<span class="pull-right">
			<a href="/#/" class="btn btn-primary btn-xs">View</a>
			<a href="/#//edit" class="btn btn-success btn-xs">Edit</a>
			<a class="btn btn-danger btn-xs" ng-click="deleteContact(contact.id, $index)">Delete</a>
		</span>
	</li>
</ul>
The code above displays all the contacts using ng-repeat and buttons to view, edit, and delete each contact. There’s a button for adding a new contact too.
Adding New Contact
For adding a new contact, let’s create a basic form inside our partials/add.html.
<h3 class="clearfix">
	Create New Contact
	<a href="/#/" class="btn pull-right btn-warning">Cancel</a>
</h3>

<hr/><br/>

<form class="row" ng-submit="addContact()">
	<div class="col-sm-5">
		<input type="text" ng-model="contactName" class="form-control" placeholder="Name" />
	</div>
	<div class="col-sm-5">
		<input type="text" ng-model="contactNumber" class="form-control" placeholder="Number" />
	</div>
	<div class="col-sm-2">
		<input type="submit" class="btn btn-primary btn-block" value="Submit"></input>
	</div>
</form>
Upon submitting the form, we will call the addContact() function inside our controller to gather our information and perform a RESTful submition of new contact. So we need to create new controller called addCtrl.
.controller('addCtrl', function($scope, ContactData, $location){
	$scope.addContact = function(){
		ContactData.save({name:$scope.contactName, number:$scope.contactNumber}, function(response){
			if (response.$resolved) {
				$location.path('/').replace();
			}
		});
	}
})
In our addCtrl controller, we use the .save() method of resource to send a POST request to the server together with the data of our new contact. In REST pattern, since we send a POST without an ID, the server knows we’re tying to add a new item. When saving was done, we redirect the user to index page with $location.
Viewing a Single Contact
Remember the buttons we added in each contact items? The view is a link to the page that displays all the contact informations, let’s now create that page. Open detail.html inside partials folder and write the html code.
<h3 class="clearfix">
	View Task Detail
	<a href="/#/" class="btn pull-right btn-primary">Back</a>
</h3>


<ul class="list-group">
	<li class="list-group-item clearfix">
		<h3 class="clearfix">
			<span class="pull-left">
				<small class="glyphicon glyphicon-user"></small>
				{{contact.name}}
			</span>
			<span class="pull-right text-muted">
				<small class="glyphicon glyphicon-earphone"></small>
				{{contact.number}}
			</span>
		</h3>
	</li>
</ul>
For the controller of this page, let’s create a new controller called detailCtrl and use our ContactData service to fetch the contact information.
.controller('detailCtrl', function($scope, ContactData, $routeParams){
	$scope.contact = []
	ContactData.get({contactid: $routeParams.contactid}, function(data){
		$scope.contact = data;
	});
})
We use $routeParams in our controller to access the URL parameter. The url is /1 and we get the contact’s id from the url using $routeParams.contactid. The .contactid is now the :contactid param name that we declared when we configured our routes in .config(). Then we passed that id in our ContactData’s .get() method.
Editing Contact
Open partials/edit.html and add the edit form code. It’s just the same form as the add.html except edit form has pre-populated inputs using ng-model.
<h3 class="clearfix">
	Editing Contact
	<a href="/#/" class="btn pull-right btn-warning">Cancel</a>
</h3>

<hr/><br/>

<form class="row" ng-submit="editContact()">
	<div class="col-sm-5">
		<input type="text" ng-model="contact.name" class="form-control" placeholder="Name" />
	</div>
	<div class="col-sm-5">
		<input type="text" ng-model="contact.number" class="form-control" placeholder="Number" />
	</div>
	<div class="col-sm-2">
		<input type="submit" class="btn btn-primary btn-block" value="Submit"></input>
	</div>
</form>
When the form submits, it will call editContact() method in the assign controller. In our app.js, add another controller and call it editCtrl.
.controller('editCtrl', function($scope, ContactData, $routeParams, $location){
	$scope.contact = [];

	var contactID = $routeParams.contactid;
	var objContact = ContactData.get({contactid: contactID}, function(response){
		if(response.$resolved) {
			$scope.contact = response;
		}
	});

	$scope.editContact = function() {
		objContact.name = $scope.contact.name;
		objContact.number = $scope.contact.number;
		objContact.$save(function(response){
			if (response.$resolved) {
				$location.path('/').replace();
			}
		});
	}
})
First, we use $routeParams to get the id of contact to be edited. Then we pass that id in ContactData service to get the contact’s informations and assign the returned value in $scope.contact variable. If you noticed, we assigned the ContactData service in a variable named objContact. This will allows us to easily update the resource later.
So when we submit the form, we get the name and number value in the edit form and assign them in name and number properties of objContact. Then we ussed .$save() to update the resource and redirect the user to index when update was done.
Deleting Contact
Deleting a contact is easy. We just need to the call .delete() method of our ContactData service and pass the id of the contact that you want to delete.
$scope.deleteContact = function(intContactId, intIndex){
	ContactData.delete({contactid:intContactId}, function(response){
		if (response.$resolved) {
			$scope.contacts.splice( intIndex, 1 );
		}
	});
}
Inside our listCtrl controller. Add a new function called deleteContact which will be called when the Delete button was clicked. That function will accept 2 arguments, the contact id and the index/position of that contact in array. When .delete() was finished, we will also remove the contact in the list using .splice().
Conclusion
This is supposed to be a short post about json-server and http-server but I ended up writing about the application code too. We setup http-server so we can easily work on our application routes. Then we setup json-server as a database so that we can perform REST functionalities without the complicated process of mongodb. We also discussed about $resource service and how to use its query, get, delete, and $save methods. We configured routing in config part and then create the declared controllers.
I hope this article will help you in your next projects and thank you for reading.
